Cisco Duo
The Cisco Duo lets tools and authorize with Cisco Duo and call your Duo-protected APIs, apps, and systems on behalf of a user. Duo Single Sign-On acts as an OpenID Connect (OIDC) provider, so Arcade runs the standard authorization code flow, including Duo’s multi-factor (Duo Push) prompt, and hands your a token.
Cisco Duo is the central place for your access policies: identities, groups, scopes, and multi-factor requirements all live in Duo. Arcade enforces those policies in real time, on every call. Each tool requests the scopes it needs, Duo decides what to grant for each user or group, and an can only ever act within the access Duo has authorized. Change a policy in Duo and it takes effect on the next call, with no changes to your tools or agents.
Cisco Duo is configured as a custom OAuth 2.0 provider. Duo’s OAuth/OIDC endpoints are unique to your Duo , so you bring your own Duo application credentials and endpoints. The generic OAuth 2.0 provider page is the underlying configuration reference.
What’s documented here
This page describes how to configure Cisco Duo auth with Arcade, and use it from:
- An agentic client (Claude Code, Claude Desktop, Cursor, or your own agent) connected to an Arcade gateway
- Your custom tools that call the APIs, apps, and systems protected by Cisco Duo
Create a Cisco Duo OIDC application
When using your own app credentials, make sure you configure your to use a custom user verifier. Without this, your end-users will not be able to use your app or in production.
In the Duo Admin Panel :
- Go to Applications → Protect an Application.
- Search for OIDC and select the Single Sign-On application that makes Duo the OpenID Provider, labeled “OAuth 2.1 / OIDC - Single Sign-On” or “Generic OIDC Relying Party”, depending on your Duo version. Click Protect.
- On the General tab:
- Enable the Authorization Code grant type. Also enable Refresh Token if you want Arcade to refresh tokens silently.
- Leave Sign-In Redirect URLs empty for now. You’ll add the Arcade-generated redirect URL after you create the provider in Arcade.
- On the Scopes tab, enable
openid,profile, andemail. Add any custom scopes your API requires (for example,crm.contacts.read). Duo requires each custom scope to map at least one claim. - On the Clients tab, add
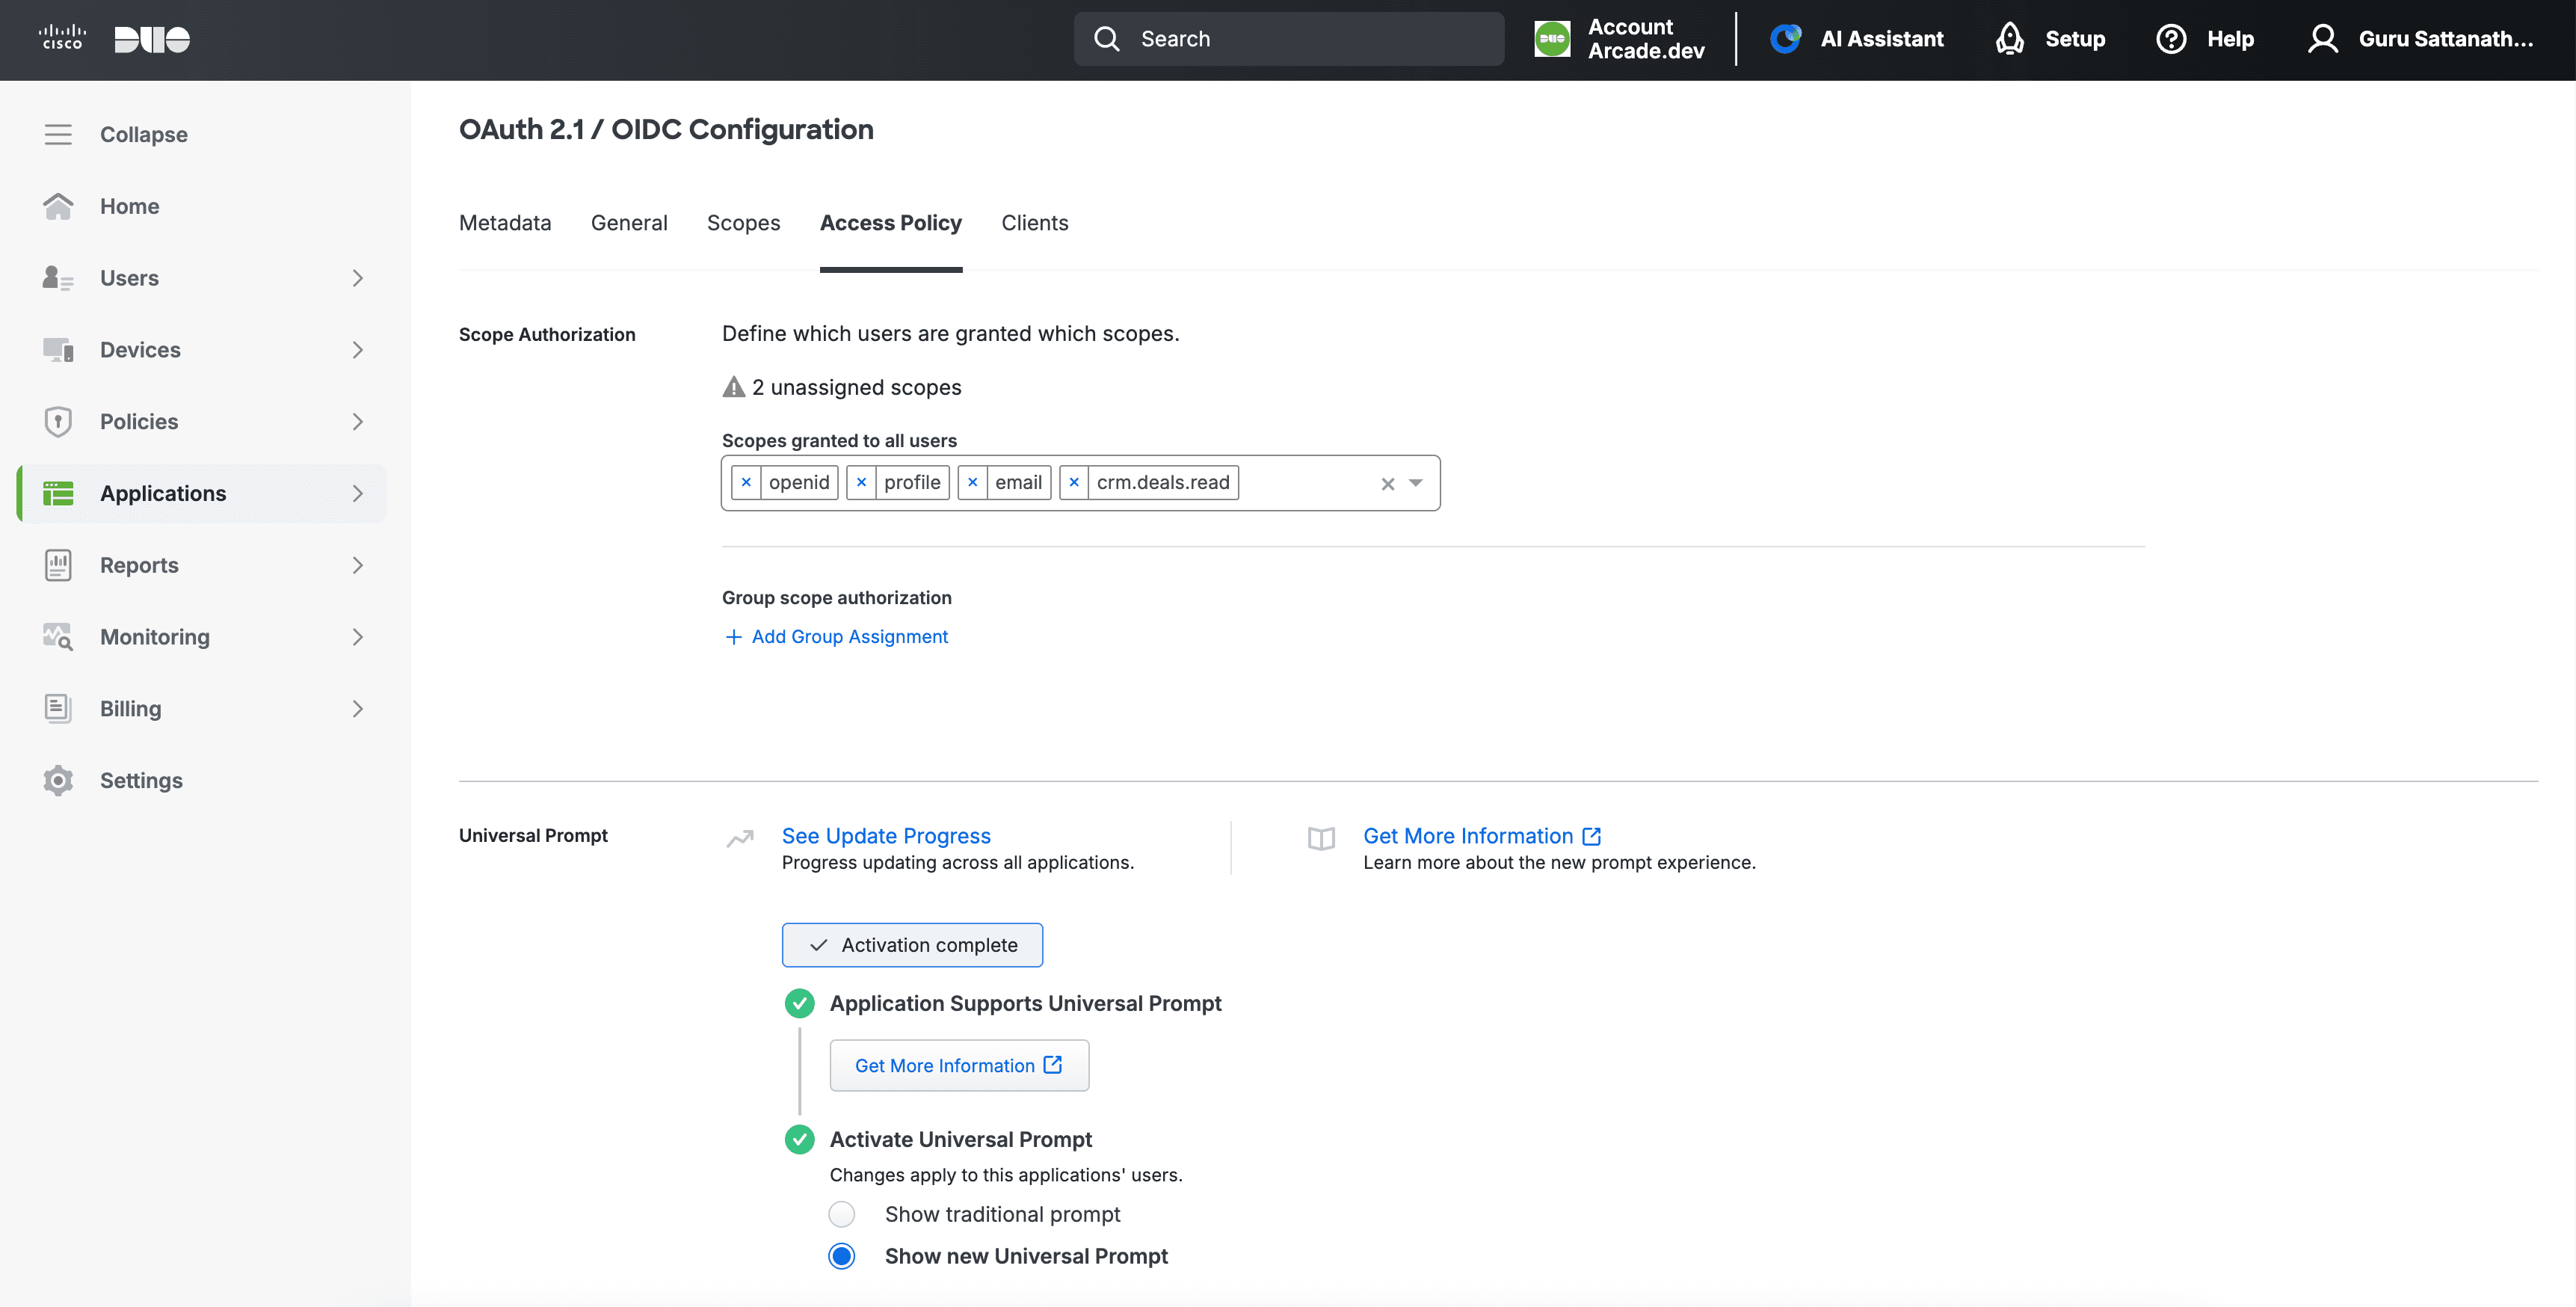
openid,profile,email, and any custom scopes to the client’s Confidential client scopes so the client is allowed to request them. - On the Access Policy tab, under Scope Authorization, grant the scopes to the users or groups who should have them. Duo becomes the authorization source of truth: revoking a scope here blocks the that require it.
- Set access to the users or groups who may sign in, and confirm the application’s policy requires two-factor authentication so the Duo Push prompt is shown.
- Click Save.
The Access Policy tab is where you grant scopes to users and groups, which decides who can run which :
From the application’s Metadata tab, copy the Client ID, Client Secret, and the Issuer. The Issuer looks like https://sso-<tenant>.sso.duosecurity.com/oauth2/<app_id>. You’ll need these values in the next steps.
Get your Duo issuer URL
All of your Duo OAuth/OIDC endpoints live under your ’s per- Issuer base URL, shown on the application’s Metadata tab:
https://sso-<tenant>.sso.duosecurity.com/oauth2/<app_id>The endpoints are derived from it:
- Authorization:
<issuer>/authorize - Token:
<issuer>/token - UserInfo:
<issuer>/userinfo
Copy the exact Issuer from the Metadata tab rather than building it by hand. The <tenant> and <app_id> segments are specific to your Duo and application.
Configuring Cisco Duo auth
Dashboard GUI
Configure Cisco Duo auth using the Arcade Dashboard
Access the Arcade Dashboard
Go to the Arcade Dashboard and log in with your Arcade credentials.
Navigate to the OAuth providers page
- Under the Connections section of the Arcade Dashboard left-side menu, click Connected Apps.
- Click Add OAuth Provider in the top right corner.
- Select the Custom Provider tab at the top.
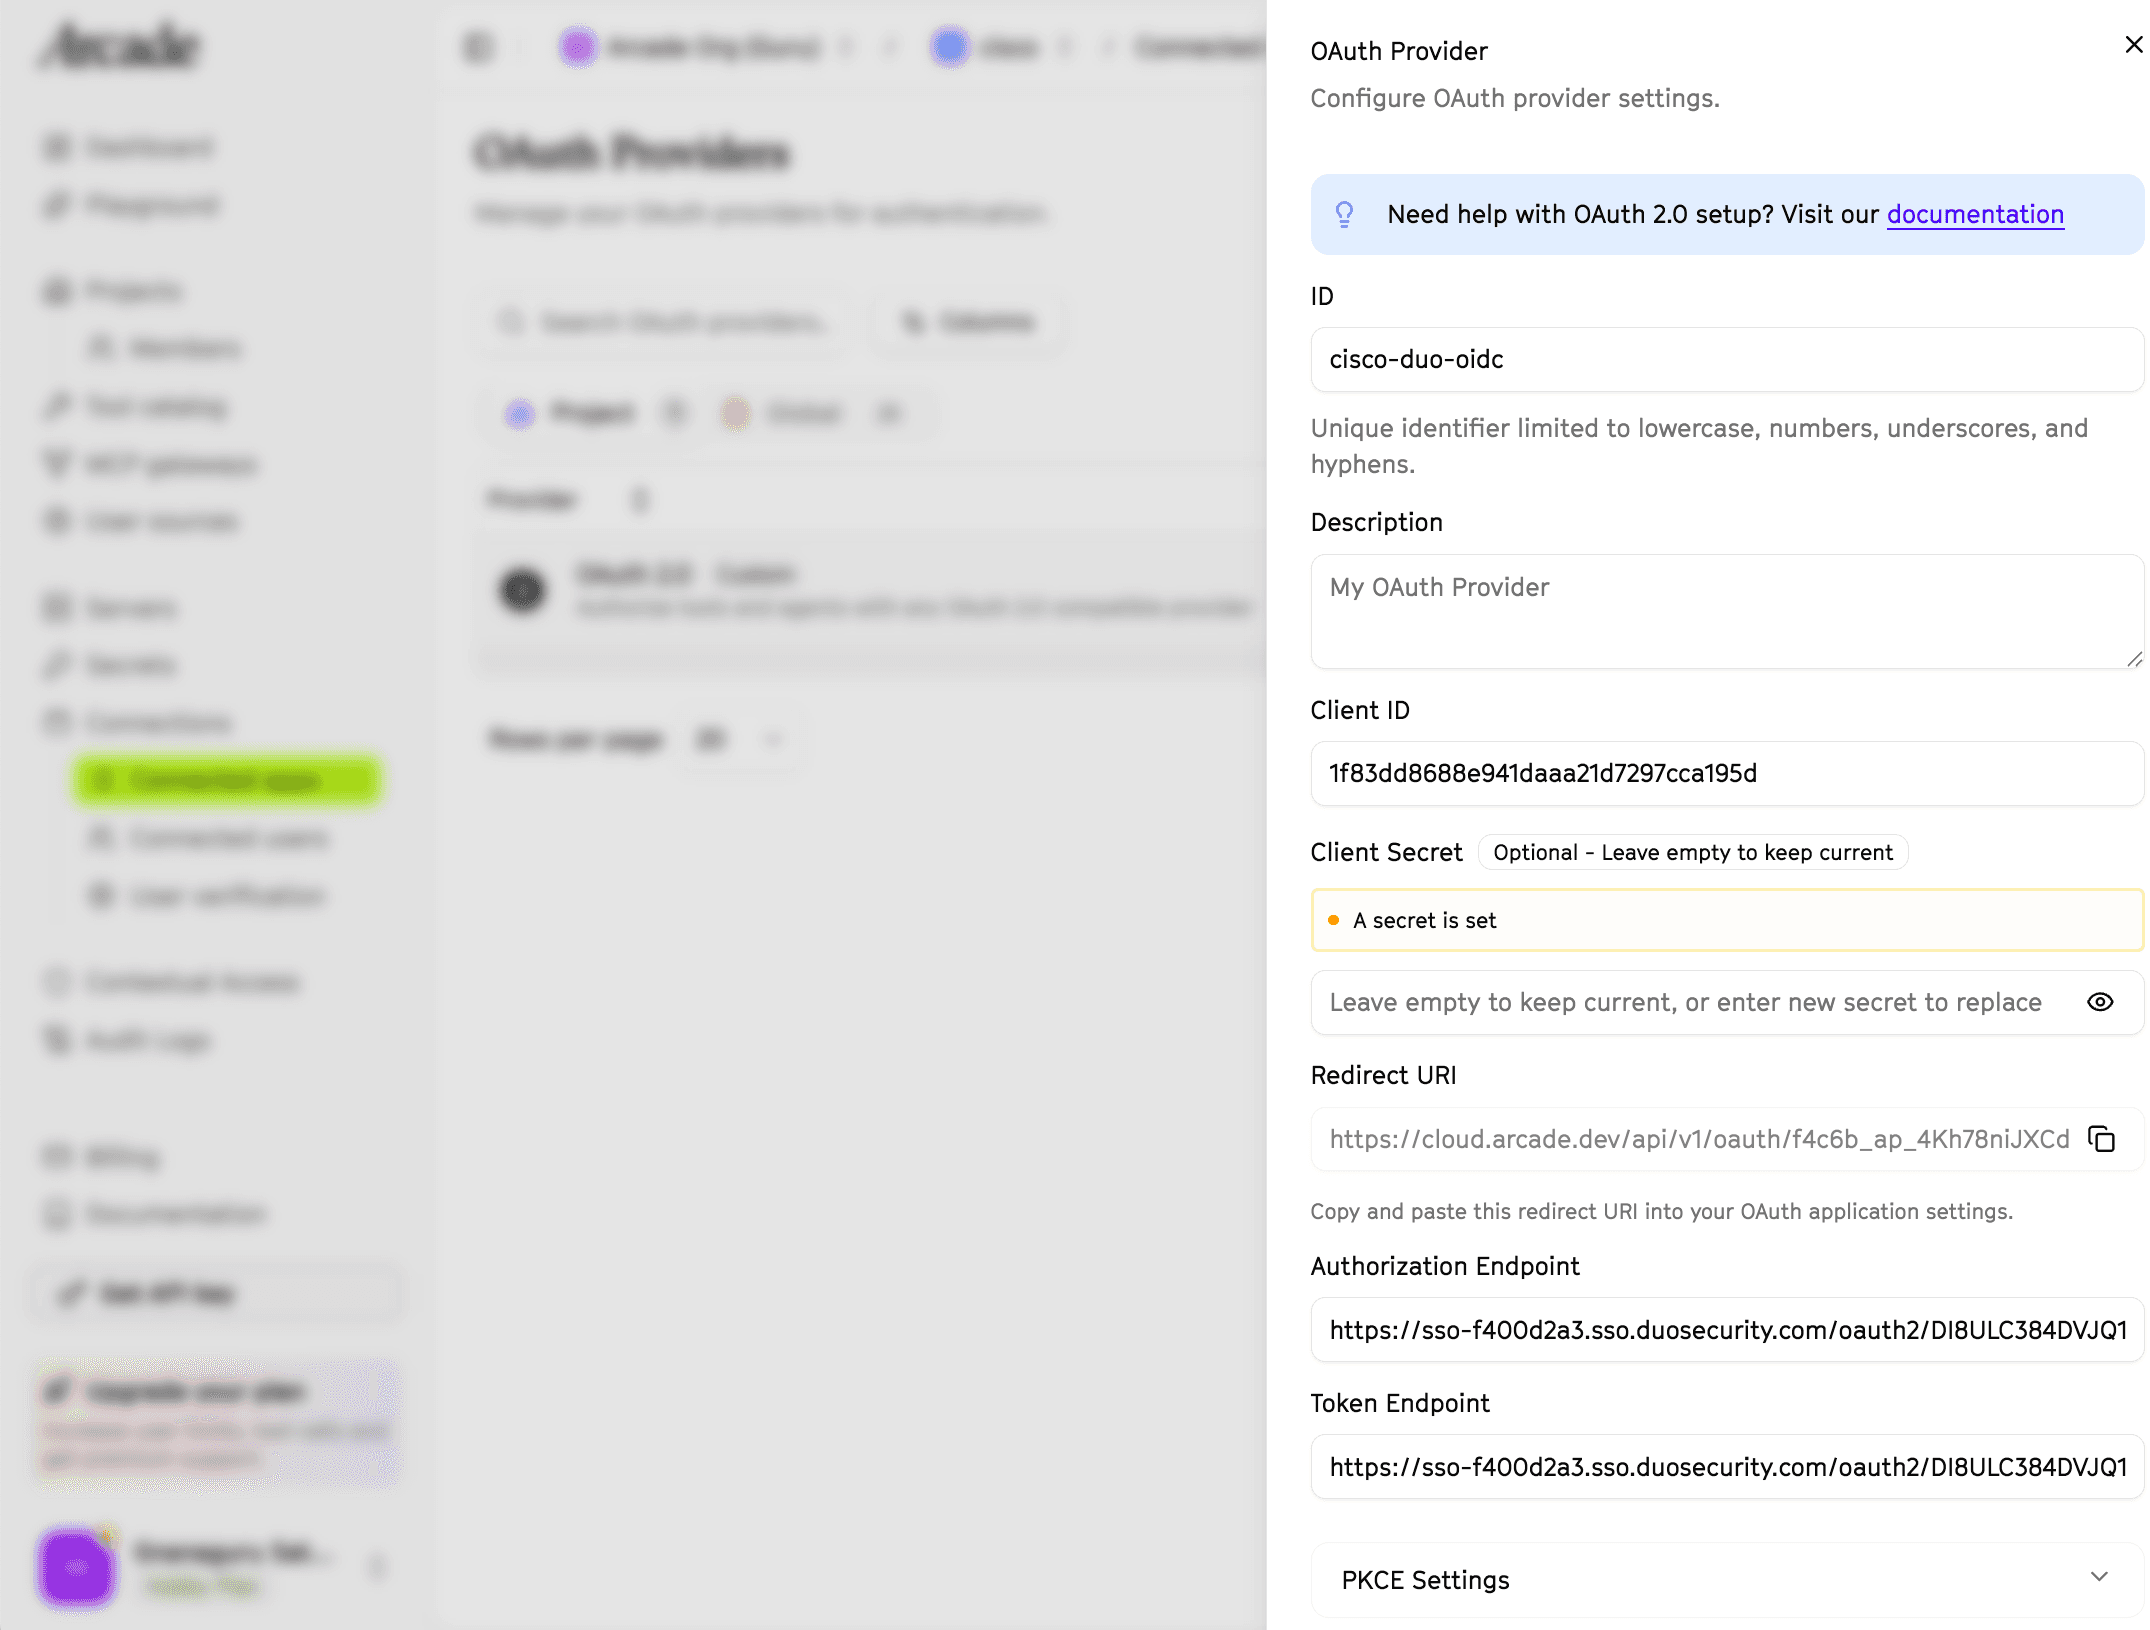
Enter the provider details
- Enter
cisco-duo-oidcas the ID for your provider. It can be any unique string you reference from your and app code. - Optionally enter a Description.
- Enter your Duo Client ID and Client Secret from the application’s Metadata tab.
- Note the Redirect URL generated by Arcade. You’ll add it to your Duo application in a later step.
Configure the auth endpoints
Replace <issuer> with your Duo issuer URL, for
example https://sso-abcd1234.sso.duosecurity.com/oauth2/DI0123456789ABCDEF.
- Authorization Endpoint:
<issuer>/authorize - Token Endpoint:
<issuer>/token - Under PKCE Settings, check Enable PKCE and select method S256. Duo is OAuth 2.1 and requires PKCE.
- Under Authorization Settings, set the
scopeparameter to{{scopes}} {{existing_scopes}}. Requestopenid profile emailplus any custom scopes your API needs. - (Optional) Under Info Settings, set the User Info Endpoint to
<issuer>/userinfo.
Your provider configuration should look like this:
Add the redirect URL to Duo
Copy the Redirect URL that Arcade generated and add it to your Duo application’s Sign-In Redirect URLs (on the application’s General tab), then save the Duo application.
Create the provider
Click the Create button. Cisco Duo is now ready to be used in the .
Use Cisco Duo from an agentic client
The most common way to use Cisco Duo with Arcade is to put a Duo-protected system (an API, database, internal app, or other enterprise system) behind an server, make it available in Arcade, and connect any agentic client (such as Claude Code, Claude Desktop, Cursor, or your own agent) to your Arcade . Each declares the Cisco Duo scopes it needs, and Arcade runs the Duo sign-in (including Duo Push) the first time a calls it. The access token never reaches the model or the client.
Deploy a Duo-protected MCP server to Arcade
Build an server whose require Cisco Duo auth (see Create your own Duo-authorized tools), then make it available in Arcade by either:
- Deploying a custom MCP server to Arcade with
arcade deploy, or - Adding an existing remote server to your Arcade .
Once deployed, your server and its appear in the Arcade Dashboard under Servers. Each tool shows the Cisco Duo provider it requires:

Connect your agentic client to an MCP gateway
Create an MCP gateway that exposes your server’s , then connect your client to the gateway URL (https://api.arcade.dev/mcp/<your-gateway>).
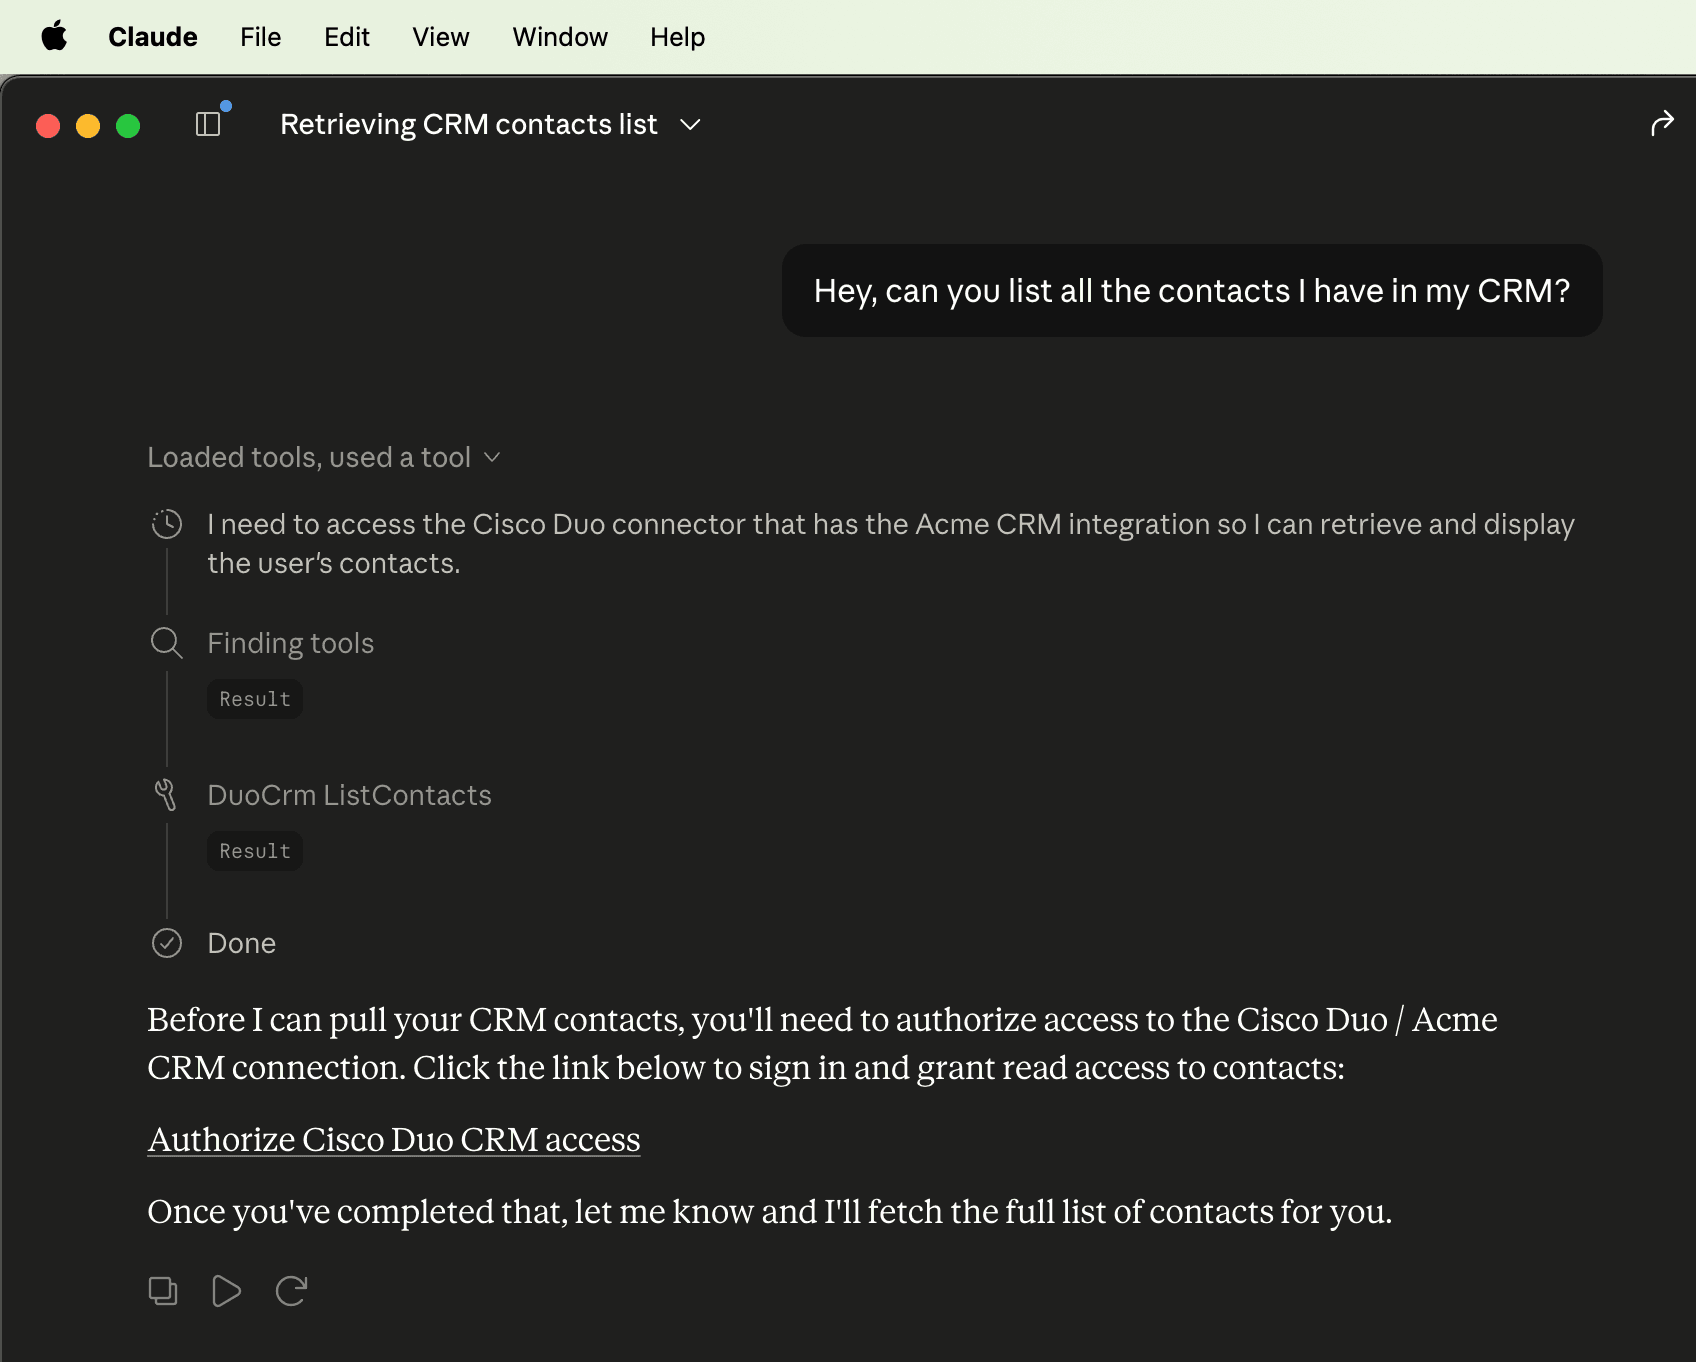
Call a tool
Ask the to do something that uses one of your tools. The first time, Arcade returns a Cisco Duo authorization link. The user signs in and approves the Duo Push, then the runs. Subsequent calls reuse the authorization.
Create your own Duo-authorized tools
Tools that call the APIs, databases, and enterprise systems protected by Cisco Duo are built like any other Arcade , so follow the Add user authorization to your tools and Build an MCP server guides.
The only Duo-specific part is the auth requirement on each : use the OAuth2 class with the provider ID you configured and the scopes the tool needs.
from arcade_mcp_server.auth import OAuth2

requires_auth = OAuth2(id="cisco-duo-oidc", scopes=["openid", "profile", "email"])